Thursday, March 29, 2012

Roman Shade with a Shaped Bottom

Hope everyone is having a great day on this beautiful spring morning!  I usually do a tutorial on the projects I share, but this is one I did before I started my blog.  I don't always get the opportunity to see my work after it is installed, but I'm doing some additional work for this house and was there last week.  I'm really pleased with the way it came out.  The designer who hired me to make this is really talented and she is my favorite to sew for.  She always adds interesting details that make her projects fun to sew and anything but boring.
Isn't it adorable?!  I love the graceful lines this designer chose and the tassels give it that finished detail!
The similar lines of the valance are a perfect topper for this window.

I'll be making some more shaped Roman Shades for this designer this week, I'll try to do a tutorial and break it down in simple steps.Pin It Pin It

Thursday, March 22, 2012

Ottoman Slipcover

Slipcovers are very popular and many people love them for their versatility.  They can transform old worn out furniture into fresh updated eye catching pieces that can easily steal the spotlight in any room of the house.  They can be easily laundered which makes them a lifesaver for people with small children and pet owners.  If you have a love of slipcovers like I do and have always wanted to make your own, then follow along as I start a series of slipcover tutorials.
If you plan to machine wash your slipcover, then you want to make sure you purchase fabric that is machine washable.  Before you start your slipcover you must preshrink your fabric.  I always suggest washing 5 yards at a time.  If you wash anymore than that the fabric will rub against itself and abrade.  So if your slipcover requires 15 yards of fabric, measure out 5 yards, cut it off the roll and wash.  Then you can do 2 more loads of 5 yards each.  If possible, roll the fabric back on the cardboard tube immediately after you remove it from the dryer.  If you plan to wash your slipcover in hot water, then preshrink your slipcover in hot water.  Dry it on the hottest setting you will be drying your slipcover on.

For today's tutorial I will be slip covering an ottoman.  This ottoman is for a friend of mine that is remodeling her RV.  If you read my butterfly balloon shade tutorial, this is for the same RV and I was able to get some pics of the almost finished interior.
Most ottomans will take 4 yards or less of fabric depending on the size of the ottoman and the skirt style you choose.  Today's ottoman is large and has a box pleated skirt with contrasting insets.  In fact we used 5 different fabrics on this ottoman so the yardage varied.
Here's the ottoman we are slip covering.
Since ottomans are not perfectly square or rectangle I do not just measure the top.  They have to be formed to fit the top so I pin fit the whole ottoman.
The first step in any slipcover is to block the fabric to the furniture.  This means cutting a piece of fabric larger then the area it is to cover and pinning it to the furniture with T pins.  If you aren't familiar with T pins, here's what those look like.
Cut a piece of fabric for the top, cut it 3-4" bigger in each direction.  Position it on the top of the ottoman and T pin it.
Since the fabric being used for the top of this ottoman is a dark brown fur, it is hard to see the T pins.  But pin your fabric in each corner and along any log edges.  You don't want the fabric to shift on you in the middle of pinning.
Now measure the side boxing of the ottoman and cut strips that are 2-3" wider and longer then each boxing side.  Tpin them to each boxing side.
Following the curve of the corner, using regular pins, pin the boxing sections together at the corners.  You want the pins close to each other.
After you have all four corners pinned, using sharp scissors trim these seams down to a 1/2".
I cut small notches in these seam allowances so I will be able to match them up easily when it's time to sew them.  I cut the notches of each corner in a little bit different spot and if need be I put 2 notches to easily identify a specific corner.
Now pin the top ottoman fabric to the boxing fabric in the same manner.  Keep the fabric taught, but don't stretch it too much.  Pin fairly close, 2" apart should be good, but you can put your pins closer if you like.  I pin from the top because I can see if I'm following the shape of the top correctly, but here's a view from the bottom since the pins were hard to see with the fur fabric.
After you have the top pinned all the way around, trim this down to a 1/2" seam allowance also.  Again cut small notches in the seam allowance every so often to help you figure out what pieces fit together.  It's kind of like forming puzzle pieces, the notches are going to help you decipher what pieces match up when it's time to sew them.
If your ottoman is going to be on carpet, measure the skirt on carpet.  If your ottoman is going to be on a hard floor surface measure it on a hard floor.  Using a ruler, measure how high up you want the skirt.
My skirt is going to be 11" long, so I subtracted 1/2" for seam allowance and marked around all 4 sides of the boxing at 10 1/2".  My tailors chalk was not showing up well, so I use an ink pen.  I often use an ink pen when marking stuff, because I'm confident in my marks.  But since you are a beginner, I don't recommend using an ink pen.
Using a ruler connect these 10 1/2" marks you've made all around the bottom of the boxing.  Cut along this line.
You're ready to remove all the pins and Tpins and begin the sewing.

Make enough welt cord to go around the top of the boxing and the bottom of the boxing.  The welt for this ottoman was a stripe.  You can find my instructions for cutting and making welt cord here.  Make sure you cut your fabric strips on the bias for the welt cord, it just lays so much better.

Starting at the center of one side of your top piece, extending the welt 1/2" before you start stitching, stitch the welt to the top of the ottoman.

When you have sewn the welt all around the top and you are approaching your starting point, stop with the needle down approx 3" from the center.  Cut the welt an inch or so past the beginning welt edge.
Open up the seam allowance and fold under 1/2".  Lay this under the starting welt and trim the cord filler so it will butt up to the beginning welt.
Wrap the ending welt fabric over the beginning welt cord and finish stitching.
Boxing-  Match up all four side of your boxing and stitch these seams.  If you notched them well, you should have no problem figuring out which ones fit together.
Once you have all your boxing pieces sewn together, pin and stitch them to the ottoman top.  Again, follow your notches.  Stitch close to the welt cord edge.  Sorry, I didn't get a picture of this step.  Clip the seam allowances of the boxing to go around the corners just like you did with the welt cord.

Directly down from where you started and stopped your welt on the top of your ottoman, start your welt at the bottom of the boxing.

Attach the welt all the way around finishing off the end like you did with the previous welt.

Place the slipcover top on your ottoman to make sure it fits right.  See if there are any adjustments you need to make and make them.

Skirt-  My skirt for this ottoman was complicated!  It was a box pleat with contrasting inserts.  I thought I had measured and figured all my skirt pieces accurately and when I went to pin it to the bottom of the slipcover, it was not lining up right.  I had to fudge it a little.  You can add whatever skirt style you want to your ottoman.  I will attempt to give instructions for this skirt, but it may be confusing.

Measure and jot down all four boxing widths.  My long edges were 50" and my short edges were 32".  My friend wanted her box pleats to be approx. 4" wide and the contrast insets to be approx. 2" wide.  So each pleat and it's contrast would take up 6" of space.  Divide your edge by the 6", which told me I would have 8 box pleats on each long edge and 5 box pleats on my short edges.
I wanted the pleats to fold back under 2",  so for the front of the box pleats I cut my pieces 9".(4" front+2" fold back+2" fold back+1" for two 1/2" seam allow)
For the contrast inserts, I cut them 7"(2" to show between box pleats+2" fold back+2" fold back+1" two 1/2" seam allow)
To figure the length of your skirt pieces and how to construct the skirt with lining, refer to my box pleat bed skirt tutorial here.
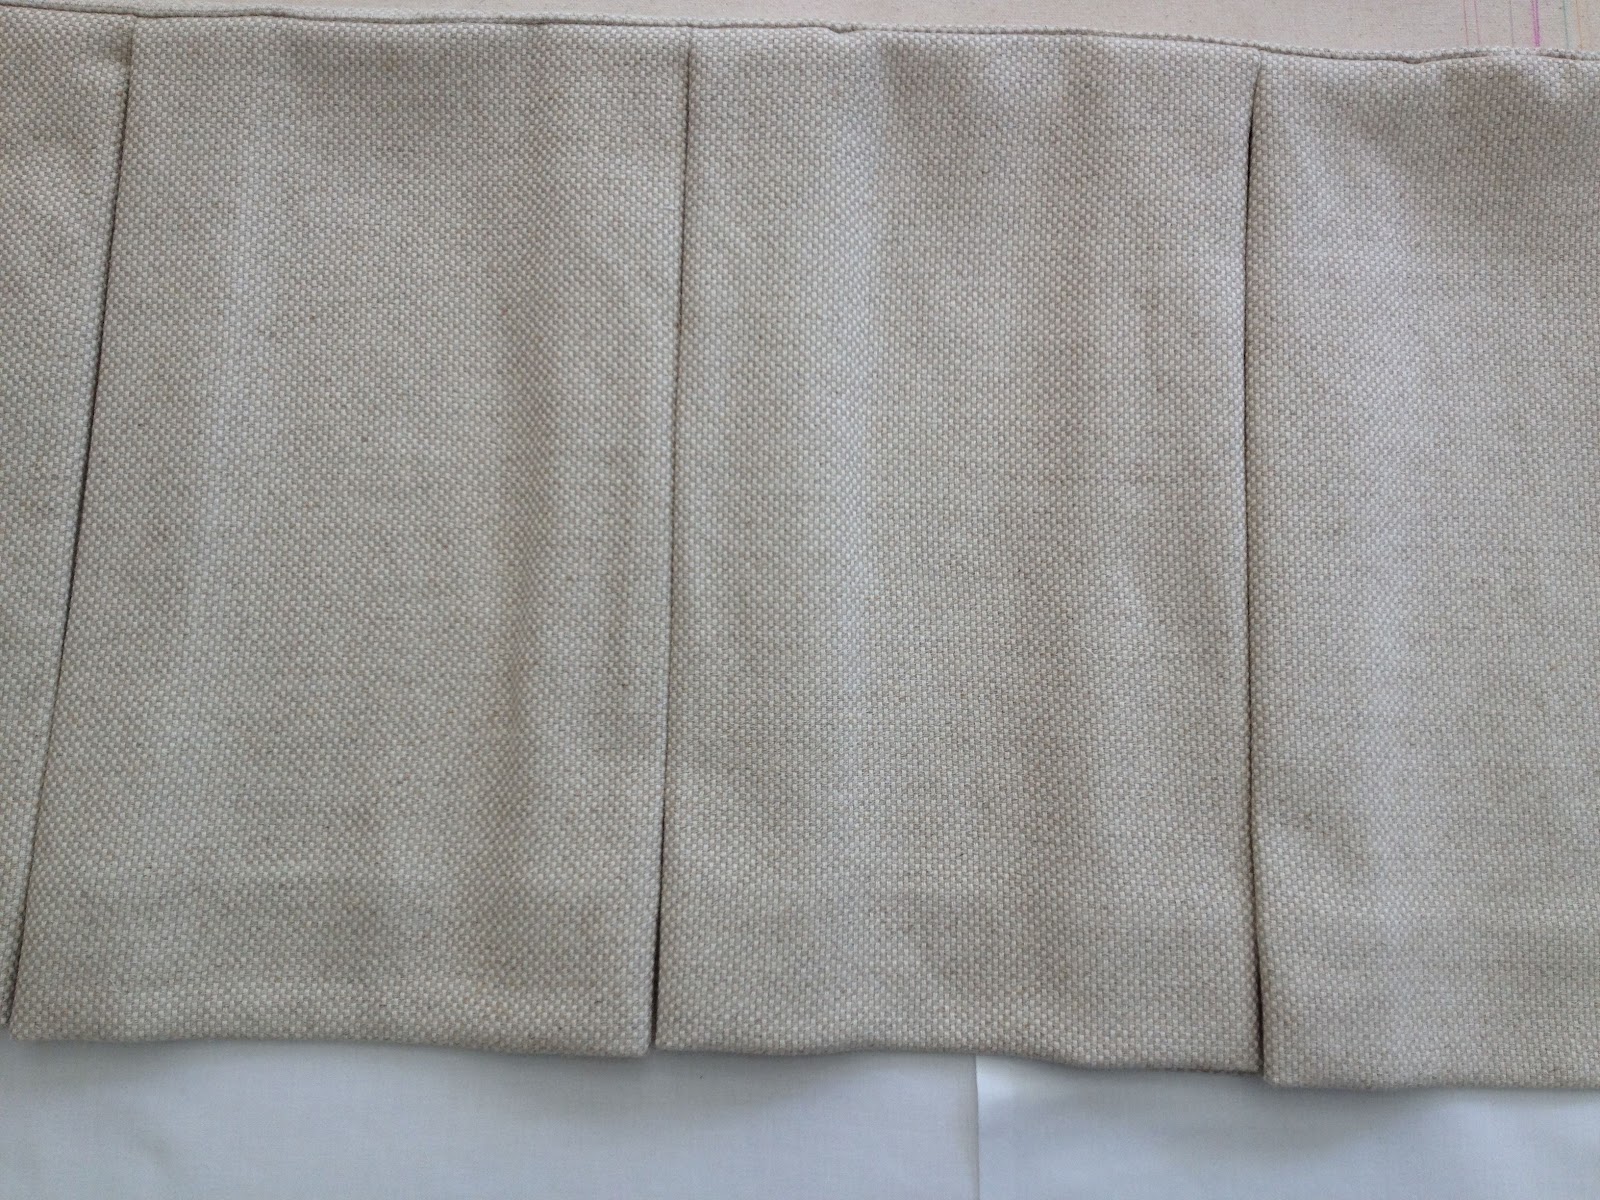
Pin your box pleats to the bottom of the boxing and stitch close to the welt.
Turn and press the pleats in really well.
Here's what mine looks like all finished.


 Cute huh!  My friend was very happy with it and it looks adorable in their newly remodeled RV!  Pin It Pin It

Saturday, March 17, 2012

Mitered Stripe Pillow Tutorial

I know some of you aren't feeling the spring weather yet, but here in California we have had some really nice spring days.  Spring always brings out a certain excitement within me.  It means warmer days are ahead.  So I've been sprucing up the garden and preparing for the long warm days I enjoy so much.  One of the things I'm re-doing is my outdoor pillows and cushions.  I usually change them out every year because I get bored and restless with them.  Last years colors were browns and greens, this years colors are whites and blues.

I popped in a local thrift store the other day and found 3 of these fabric samples for 25 cents each.  Heck with the fabric only costing .75 cents I can switch my pillows out often.
I knew instantly that I would use these striped fabric samples to make a mitered pillow.  I'm sure you guys have all seen pictures of these in magazines and catalogs.  So here's a tutorial for mitered stripe pillows.

First you have to decide on the size you want your pillow.  I decided to make my pillow 20"x20"

I made my pattern from some brown craft paper, you might want to use wax paper or parchment paper.  Any paper that you can see through.  Simply tape a few sheets together.
On your pattern paper using a ruler, draw a square the finished size of your pillow.  Now add 1/2" seam allowance around your pillow.  Next draw 2 lines diagonally from corner to corner.  This should give you 4 triangles.  We're going to focus on just one of these triangles to use as our pattern.

Once you have your 4 triangles like the diagram above, add 1/2" seam allowance to the outside edge of your triangle pattern.  Cut this triangle out along the red cutting line, it is the only pattern piece you will need.  You can discard the rest of the drawing.
Lay your pattern piece on your striped fabric until you have the stripes you want featured.  Keep in mind that your seams will take up 1/2" and plan your stripes accordingly.
Since I could see through my paper, it made lining up the stripes straight really easy.  If you need to, trace the stripes of your fabric onto your pattern to help unsure you cut all 4 triangles out with the stripes landing in the exact same place on your pattern piece.  Cut 4 triangles.
 Once you have all 4 triangles cut out, lay one on top of the other lining the stripes up exactly.
I place pins right at the stripes to keep the fabric from shifting on me as I stitch it.
Stitch carefully keeping the stripes aligned.
Repeat this step with the other 2 triangles.  While I'm still at the sewing machine, I always open out my fabric to check and make sure the stripes stayed lined up.
Now you should have 2 large triangles.  Press the seams open and pin these two triangles together matching the stripes again.
Stitch carefully making sure everything lines up nicely.  Mine did not line up perfectly the first time as the picture below shows.
So I took out a few inches of stitching and gave it a second try.  When you have all the stripes lined up, press this seam open as well.
Your pillow front is ready for you to finish constructing the rest of the pillow.  You can find instructions for finishing the pillow here.
Here's what mine turned out like.
I decided to add a covered button to the middle of mine.
 Pin It Pin It

Saturday, March 10, 2012

Box Pleat Bed Skirt

A month or so back I had received a request for a tutorial on Box Pleat Bed Skirts, so here it is.  If anyone else has something they want to learn to make, shoot me an e-mail and I will gladly oblige.

This bed skirt was for a designers client, so I don't have pictures of it on the bed.  It was for a day bed and required split corners to accommodate the bed frame.

Always measure the box spring itself, not the mattress, their sizes can vary slightly.  This day bed measured 71x39"and was to have a 17" long skirt.
Here's the basic anatomy of this bed skirt and the box pleat divisions.
Notice all of my box pleats are not going to be the same width.  That's OK, this small difference won't matter.  Also notice I make a flap out of lining to hang down the back edge of the day bed.  If you are making this for a regular bed, you will omit this flap and simply do a hem along the head of the lining deck.

There's going to be a lot of math to figure your cuts, but follow carefully and it won't be hard.

The first thing you will cut is the deck.  This is cut out of lining, but you can cut it out of an old sheet.  The deck is what goes between the mattress and the box spring.  Just add a 1/2" seam allowance to all sides, so I cut mine 72"x40".
If you are making this for a day bed like I am, then cut your flap out of lining too.  Add 1" to each side for a small hem allowance and make it a little shorter than the height of the bed skirt.  I cut mine 73"x15".

Now to figure the cuts for our box pleats for all three sides.  First off, I number my cuts starting from the left side of the bed and working my way around to the right side of the bed.  This helps when it is time to sew all these box pleat pieces together.  It helps ensure I don't sew them out of order.  You can either write directly on the fabric up in the right hand corner(inside the seam allowance) or sometimes I use painters tape to number my pieces.
My left side of my bed skirt is 39" wide.  As the diagram above shows I will be making my box pleats 9 3/4" wide.  The fabric I used was slightly wider then 54" wide which was good because some of my pieces were 56" wide.  I made my pleats 2 1/2" deep.
Cut 1-  3"(double 1 1/2" hem allow.)+5 (2 1/2"+2 1/2" which makes up one half of a pleat)+9 3/4"(pleat front)+10"(2 1/2"+2 1/2"+2 1/2"+2 1/2" which equals a whole pleat)+ 9 3/4"(pleat front)+8 (which makes up 3/4 of a pleat plus seam allow 2 1/2"+2 1/2"+2 1/2"+1/2")=45 1/2"  This is how wide you will cut piece 1 of your box pleat skirt.  We'll figure the length of these cuts in a bit.
Cut 2-  3"(1/4 of a pleat plus 1/2" seam allow)+9 3/4"(front of pleat)+10(whole pleat)+9 3/4"(pleat front)+5"(half of pleat)+3"(double 1 1/2" side hem)=40 1/2"
Those are the 2 cuts for the left side of this day bed skirt.  Now for the front of the day bed, remember these pleat fronts will be different sizes.
Cut 3-3"(double 1 1/2" side hem allow)+5"(half of a pleat)+10 1/4"(pleat front)+10"(whole pleat)+10 1/4"(pleat front)+8"(3/4 of a pleat plus 1/2" seam allow)=46 1/2"
Cut 4-  3"(1/4 of a pleat)+10"(pleat front)+10"(whole pleat)+10"(pleat front)+10"(whole pleat)+10"(pleat front)+3"(1/4 of a pleat plus 1/2" seam allow)=56"....this is the cut that if my fabric was only 54" wide I would not have been able to cut it.  I would have had to make an extra cut to accommodate my fabric width.
Cut 5-  8"(3/4 of a pleat)+10 1/4"(pleat front)+10"(whole pleat)+10 1/4"(pleat front)+5"(half a pleat)+3"(double 1 1/2" side hem)=46 1/2".
Those are the cuts for the front of this bed skirt.  Now for the left side pieces.
Cut 6-  3"(double 1 1/2" side hem)+5"(half a pleat)+9 3/4"(pleat front)+10"(whole pleat)+9 3/4"(pleat front)+8"(3/4 of a pleat plus seam allow)=45 1/2"
Cut 7-  3"(1/4 of a pleat plus seam allow)+9 3/4"(pleat front)+10"(whole pleat)+9 3/4"(pleat front)+5"(1/4 of a pleat)+3"(double 1 1/2" side hem allow)=40 1/2"

Whew!  I hope after a while you could see and understand the series of the cuts and why they end up the size they do.  Your bed is not going to be the same size as mine, so it's important that you understand how the pleats and the fronts are joined together so you can figure your own cuts.

Now we have to figure the length of our cuts.  Since my bed skirt is going to finish at 17" long, and I wrap my face fabric to the back by 2", this is how I figure my cut lengths.


I also add a banding to the top of my deck out of the face fabric.  This banding keeps the white lining from ever showing if the bed skirt shifts.  So cut 5 pieces the width of your face fabric by 3" long.

All the math and cutting is done, now we can begin to sew!

Step1- Stitch your bed skirt pieces together.  Since mine has split corners I will not sew them all together.  Instead I will sew pieces 1&2 together, then 3,4 &5 together, then 6&7 together.  But if you don't have split corners, all your pieces will be stitched together to make a really long strip.
Stitch all your lining pieces together to make one really long strip.
Stitch all your banding pieces together to make another really long strip.
Step 2- Pressing-  I try to do as much pressing as possible every time I go to my pressing station.  Press the skirt seams open.  Also press your skirt lining seams open.  If you're doing a day bed like me and you have a flap, press double 1/2" side hems.  Press the banding seams open and the press 1/2" up along one of the long edges.


Step 3- Stitching the skirt fronts to the skirt lining.  With right sides together, stitch the bottom edge of your skirt fronts to the bottom edge of the skirt lining using 1/2" seam allowance.
And since you're at the sewing machine, top stitch the side hems of the flap. And set it a side for now.

Step 4-  More pressing- Lay your skirt/lining right side down on your pressing surface and press the seam allowances towards the lining.  Then bring the top edge of the lining up to meet the top edge of the face fabric, wrong sides together.  Pin along the raw edges up top and press the bottom hem nice and crisp.
Once you have that upper edge all pinned together, it's time to press the side hems.  I obviously have a lot more side hems to press since my bed skirt has split corners.  If yours doesn't have split corners you will only have 2 side hems to press.  Press up double 1/2" side hems.  I press up 3" first, then open it up and fold my edge to the first crease line and press again.  I also press the very bottom corner of these side hems up diagonally, this helps take the bulk out of the bottom corner of our hemmed edge.
Step 5- Using a blind stitch, sew the side hems of the skirt.
Step 6- Attaching the skirt to the deck
I round the corners of my decks because box springs have rounded corners and we want this to fit really nice.    I use a 5 1/2" circle template to round my corners.  Just draw it on the deck corners making a slight mark where the exact corner is and cut out around the curve.
With wrong sides together, pin your skirt to your deck.  Yes, I said wrong sides together.  Pin in all your pleats and 1/2 pleats.  If they are off a little, you can fudge your pleat depth a little, no one will ever know.

Once you have your skirt pinned to the deck and in my case my flap pinned too, lay the banding on top with the right side down.  Turn under 1/2 at the beginning of your banding.  Stitch using 1/2" seam allowance.  When you get to the end, cut off any excess banding allowing 1/2" to under at this edge too.

Step 7-  Top stitching banding.  Open out your deck and skirt and push the banding over the right side of the deck.  Top stitch close to the folded edge.
Step 8- Final Pressing.  Give your bed skirt a good final pressing.  Be sure to press those box pleats nice and crisp.
 Pin It Pin It